How Much Does it Cost to Paint the Interior of a House? 

Posted on: October 20th, 2020

Interior Average pro cost

There are several aspects that contribute to determining the cost to paint the interior of a house. Obviously, factors such as square footage, quality of paint, ceiling height, and ease of access need to be considered. But the biggest factor when it comes to determining interior painting cost will be if you decide to tackle the project yourself or decide to hire a professional painting company. In this post, we’ll give you an idea of interior painting costs for different types of residences as well as how to save money during the process. 

If you need the interior of your home painted and would like a professional to do it for you in Sacramento, we’ll give you a free estimate! We serve the entire Sacramento area including Folsom, Dixon, Stockton, and El Dorado County.

Free Estimate

Do You Paint Walls or Trim First?

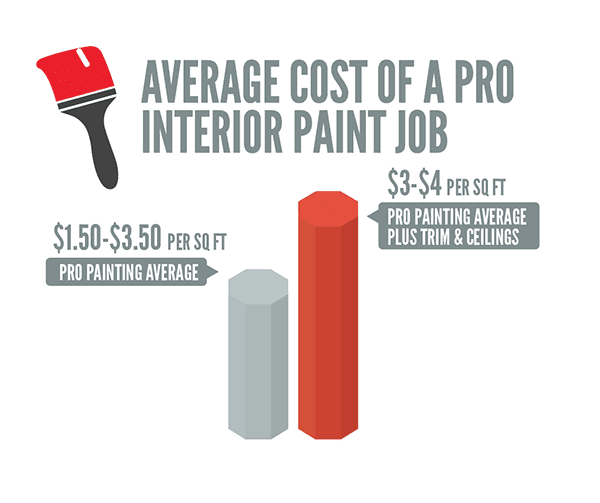
Interior Painting Cost per square foot 

In general, the cost to paint a home’s interior is based on the size and layout of your home. On average, the cost to paint the interior of a home is between $1 to $3 per square foot. The cost goes up to around $4.50 per square foot if you’re including walls, ceilings, and trim. If your home has walls taller than 10 feet, the cost per square foot can increase by $0.57 to $1.05. However, keep in mind that this is the price estimate when hiring a professional. The cost will be substantially lower if you are planning on a DIY project. 

The cost to paint the interior of a house in Sacramento, CA is typically in the range of $2-$4.70 per square foot. That doesn’t include materials. For a 12 x 14 foot room, it’ll cost you somewhere between $1,200 and $2,900.

Cost of DIY Compared to Hiring a Professional 

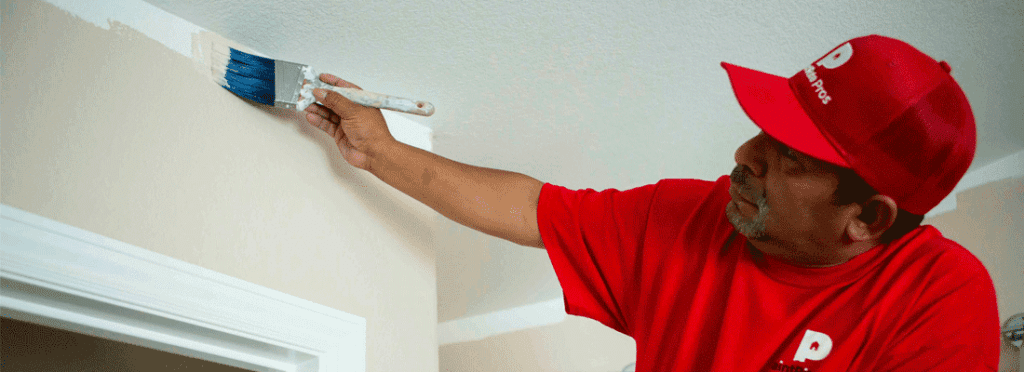
If you’re planning on DIY interior house painting there are a few things to know beforehand to ensure a successful outcome. You will most definitely pay more when hiring out the job. However, a professional will do the job right. Painting projects also take up quite a bit of time. So while hiring a painting company may cost more, it may be well worth it in the long run. Below is a list of things to consider if you are planning a DIY project. 

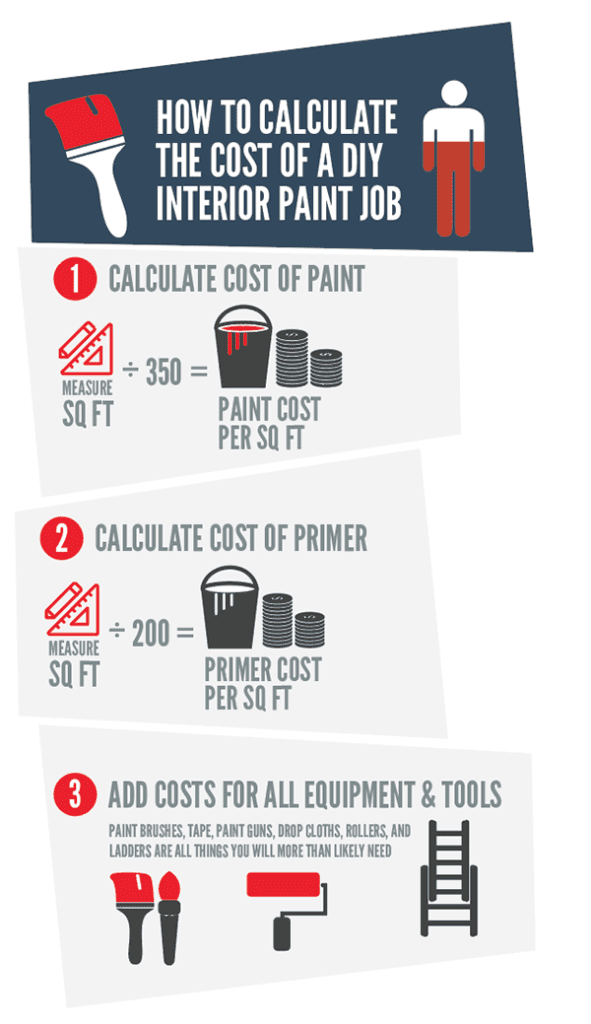
  1. Find the square footage of the actual surface you’ll be painting. This is done by measuring each individual wall. Multiply the length of the surface by the height of the wall. Once you get your total, divide that number by 350 to determine how many gallons you’ll need.
  2. Calculate the paint product cost. When calculating paint costs, it’s always best to factor in two coats of paint. This is especially true if you’re making a drastic color change.
  3. Take the number of gallons and multiply it by 1.7 for the second coat. Applying a second coat typically requires 30% less paint than was used for the first coat.
  1. Multiply the number of paint gallons calculated by the price per gallon of paint for your project. Remember that you can expect to pay around $30 to $50 per gallon if you’re buying your paint from a local Sacramento big box store like Home Depot. You’ll pay closer to $50 to $75 per gallon for the higher-quality paints from Benjamin Moore or Sherwin Williams. 
  2. Factor in the cost of materials. DIY projects require you to purchase all the necessary paint supplies out of your own pocket. While a variety of materials can be reused, they still add a considerable amount of cost to your project. 

Materials & Tools Needed: 

  • Drop Sheets
  • Painter’s Tape
  • Buckets
  • Paint Brushes
  • Paint Rollers
  • Masking Paper
  • Sanding Pads
  • Scrapers
  • Drywall Compound
  • Extension Poles
  • Ladders

Cost to Paint a 1500 Square Foot Interior 

The cost to paint an average home that is approximately 1500 square feet will roughly cost around $1500 to $2500. This is based on calculating that the average cost to paint the interior of a home runs between $1 to $3 per square foot. 

Painting Labor Cost for Interior 

Interior painting labor costs tend to vary depending on what part of the United States you live in. Local painting companies set the standard for each individual area. For example, it may cost substantially more to hire a painting company in an area where the housing market is booming and contractors can charge a higher rate due to demand. 

Interior Painting Costs by Housing Type

While the majority of U.S. citizens live in single-family homes, about a quarter of households live in multifamily housing such as condominiums and apartments, With that said, let’s discuss the specific painting costs for the different types of housing: 

Interior Apartment Painting 

On average, the cost to paint the interior of an apartment will be much lower than a home because the square footage is normally much lower. Painting an apartment can cost you somewhere between $1900 and $4500 on the high end. It’s always a good idea to check with your apartment management to be aware of any building requirements that are recommended before you start painting. 

Interior Condo Painting 

Your typical condominium usually has more square footage than an apartment which means you can expect to pay more to have one painted. The vaulted ceilings and taller walls will also increase the cost. Again, be sure to cut through all the red tape and check with building procedures before starting any interior work. 

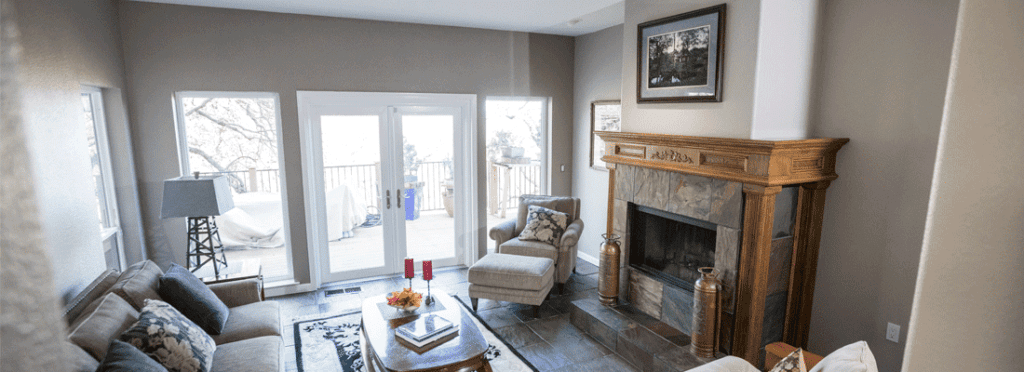
Interior House Painting 

In addition to any patchwork or prep of walls that needs to be addressed, ease of access to the painted surface and wall height are the next biggest contributors to cost. Total square footage is also a dominant factor. So, let’s break down your typical home, room by room so you know what to expect before hiring a painting contractor. 

Painting Cost by Type of Room 

  • Bedrooms 

Because of the basic box shape of a bedroom, they are considered one of the easiest rooms to paint. Easy usually means it isn’t as hard on your pocketbook either. If your room has extensive detailed trim or crown molding and is on the larger size, plan on paying more. Typically, you’ll pay somewhere between $350 and $650 to have a bedroom painted. 
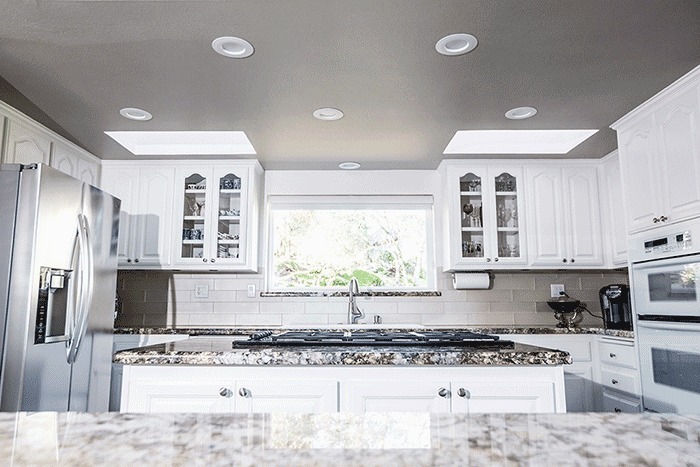
  • Kitchens 

While painting your kitchen can be time-consuming because of all the edges and appliances to paint around, they are on the lower end of the spectrum when it comes to cost. Most of the wall space is taken up by your backsplash and cabinets, meaning you won’t use much in the way of paint.

The average cost to paint a kitchen island is somewhere between $400 – $800. 

  • Dining and Living Rooms 

Most dining and living rooms aren’t too expensive when it comes to painting costs. They usually have furniture that is easy to move and not a lot of intricacies to paint around. These medium-sized rooms will generally cost you anywhere from $450-$850 to have painted by a professional. 

  • Bathrooms 

Bathrooms are similar to kitchens when it comes to painting. Much of their wall space is already taken up with tile, your shower, or large mirrors. Trim is easy to access and smaller square footage will always make bathroom paint jobs less expensive. Because bathrooms are usually one of the easiest painting jobs to do, it will run you somewhere around $250-$600.

How To Calculate The Cost Of A DIY Interior Paint Job

How to Save Money on Interior Painting 

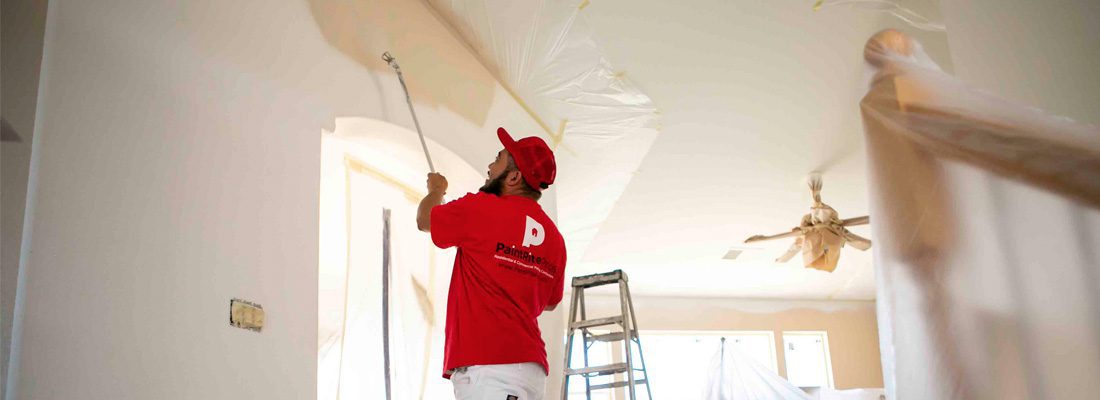
  • Hire a Professional Painter in the Winter Months 

Many people aren’t aware that the time of year you choose to paint the interior of your home can greatly impact the overall cost of the job. Hiring a professional painting company in the off-season can save you quite a bit of money. During the colder months in California when business is slow and fewer exterior paint jobs are available, companies are more competitive with their prices. If you can wait to book your interior painting work between November and February, you’ll save a considerable amount on your upgrade. 

What is the Cost to Paint the Interior of a House Conclusion

In a nutshell, hiring a painting contractor will always cost you more than doing the job yourself. But professionals are experts at what they do and know all the tricks of the trade. If you are looking for an experienced painting company in the Sacramento, Elk Grove area, contact PaintRite Pros. Our skilled team of painters have an excellent reputation with interior, exterior, and commercial painting services. Spend your precious time during the holidays with your family and friends and let us take care of your interior painting needs.

Free Estimate

How Often Should You Repaint Interior Walls?

How to Hire A Painter

Posted on: October 12th, 2020

Sometimes it can seem to be a totally overwhelming and even daunting process when you are in the market to hire a painter. Is there really any way to guarantee that you have hired a painter you can trust to do the job you need at a fair price? While not always fool-proof, there are some tell-tail signs of a reputable company and certain steps that you as the homeowner can follow to hire a painter you can be more than satisfied with. If you’d like to speak with an expert or hire a painter, we have offices in Las Vegas and Sacramento. Click here to get a free quote or give us a call. 

Hiring a painter: where to start 

It is always a good place to start by asking a family member or a trusted friend for a recommendation. Sometimes you can luck out and the referred company does an excellent job. But oftentimes disaster can still strike. That is why even with a recommendation, it’s a very good idea to do some online research. Find out if other people agree with the recommendations you were given or if they have a not so good track record. 

  1. Search for online reviews 

  • Start by looking at reviews from multiple sites. If the reviews remain consistent from site to site then that’s a good indicator that the reviews haven’t been manipulated and can be trusted. Both Google and Yelp list reviews from real customers which means authentic reviews. 
  • Also, it’s important to pay attention to how detailed the reviews are. More detail is a great indicator of experience obtained from working with a company. Plus, more thorough descriptions will give you the knowledge and insight into a company’s performance.
  • The manner in which the owner of a company replies to negative feedback is another detail you should pay attention to. Look at the explanation for a bad review and decide on its validity. But even just a quick “thank you” on a good review speaks volumes about their customer service.
  1. Ask about insurance 

No one likes dealing with insurance! It’s confusing and complicated. But as a consumer, you should never consider working with a contractor that doesn’t already have two certain types of insurance in place.

  • Comprehensive Business Liability, which simply protects your property from any damage caused by the contractor. A painting contractor should have no less than a million-dollar limit on liability coverage.
  • Workman’s Compensation which protects you and the workers while working on your property. This insurance can be very expensive so many contractors will try to work without it.
  • Request the contact information and name of their insurer. Call the insurer yourself to make sure their insurance is current and up to date.
  1. What kind of materials will be used? 

There is a very large difference in quality between paints and stains. Obviously, the better quality products that contain higher quality ingredients will look nicer and last longer. Along with coatings, the quality of other materials being used on your home will greatly impact the longevity of the paint job. It is important you find out about the products that will be used on your project. Many contractors are vague in their description and details about what products they are using and will use the cheapest supplies available. This saves the contractor money and leaves you with a sub-par outcome. Get them to specify all the details in writing.

  1. Visit the company’s website

You can educate yourself quite a bit from a contractor’s website. Look for the following:

  • Look for photos of past projects. There should be several. Also, look for images with close-ups of their detailed work. Keep an eye out for photos indicating the crew follows safety protocol and uses proper equipment.
  • You should also be able to find a page containing bios of the crew as well as pictures of them on the job. This will help you gauge the workers’ level of experience and help you know who will be showing up at your home. Sadly, there have been several documented cases where employees of a hired contractor have burglarized or injured a homeowner. In learning about who will be performing work on your home, look into their hiring policy, and whether or not they do criminal background checks.
  1. Employees or subcontractors? 

Many contractors will use subcontractors instead of hiring employees because it is the cheaper route to go. They are not required to pay social security taxes or employee benefits. However, you may be putting yourself at risk. 

  • Subcontractors are typically paid a flat fee for a job which takes away their motivation to do their best work and they may be tempted to cut corners. 
  • The contractor may not know the people on the crew, which makes it very likely that no background checks have been performed.
  • Using subcontractors increases the chances of them not having workmen’s compensation insurance. 
  1. Request a detailed proposal 

Big jobs can tend to vary by thousands of dollars. Lower bids may mean less prep and the use of cheaper materials. On the other hand, some painters may jack up the price based on what neighborhood your home is in or because they simply don’t want or need your business. 

  • In order to truly understand what you are paying for, you need to ask for a detailed proposal from your contractor. 
  • Getting your bid, which contains all the ins and outs of your expectations, can likely protect you in the future should there be any discrepancies once the project is finished. 
  1. Find out about their warranty

This is a big one! Some companies, knowing the importance of warranties, will give unrealistically long warranties and have no proof to back it up. Sadly, most of these companies will be out of business long before their warranties expire. So what is a realistic warranty you can trust?

  • A decent warranty by the contractor will provide both labor and materials for a covered defect.
  • Most warranties will have exclusions so it is good to protect yourself and find out exactly what those are.
  • 1-year warranties are pretty common and are alright as long as the work is well done. If a job has been poorly done, most signs will show up within the first year. 2-3 year warranties are also fairly common. Anything above this timeframe and you will want to look very closely at the fine print before moving forward.
  • Always get the warranty in writing 

Conclusion: How to hire a painter

Following these basic tips and guidelines should help hire a painter. With painting, like anything else in life, you get what you pay for. So save yourself some money and grief and do your homework before trusting someone with such an important job. If you have any questions about projects you are starting, contact the professionals at PaintRite Pros. We have locations in Sacramento and Las Vegas and would love to offer our professional services.

Do I Need to Prime Walls Before I Paint Them?

Posted on: October 6th, 2020

One question many homeowners ask is “do I need to prime walls before I paint them?” Years ago, many painting professionals would have recommended primer nearly every time you painted. But today, there are many more high-quality and effective paints on the market so there isn’t always the need to prime.

The answer can be a bit complicated. If you use a primer in certain interior situations, it might be a waste of money and be unnecessary. On the other hand, not using a primer can sometimes cost you more in the long run because you may need to apply multiple coats to achieve the coverage and desired look you were envisioning.

How Long Should you Wait Between Coats of Paint

What is primer?

Paint primer is a preparatory undercoat put on materials such as wood, furniture, or walls before painting.

Primer is a lot like paint but has a higher concentration of solids plus an adhesive binder in it. In some ways, it is more like glue or a sealant than paint. It seals the surface you are working with and provides a clean and smooth area for the paint to stick to.

But since not all jobs or projects need primer, it is helpful to know which factors contribute to using it or not.

When to use primer?

1. Color contrast from dark to light

Picture yourself trying to brush a pale lavender paint over a dark green shade and you will realize very quickly that priming over the dark color is necessary when making a dark to light transition. In some instances, when covering a dark coat of paint, you may need a tinted primer to help the new color look truer to the color swatch you have chosen.

2. Walls that have stains or odor

Scuffed or stained walls can greatly benefit from a coat or two of priming before painting. Some stains, such as crayon scribbles or grease spots, will show through new paint. Surface blemishes may also easily show through a lighter shade of paint so it is worth your time to use a primer if your walls have a few things to hide.

Do not, however, use a primer to cover up mold or mildew on your walls. It will only grow. First, deal with the cause of the mold and remove it. Then you are free to go ahead to prime and paint.

Cigarette smoke and other strong odors can still be left lingering after repainting. Special primers can be used to truly cover the unwanted smells and block them permanently.

3. The surface is porous

It is always a smart idea to prime before you paint a porous surface such as unstained or untreated wood. The surface is porous when it absorbs water, moisture, oil, odors, or stains. Newly installed drywall is highly porous as well but in two ways: the bare facing paper on drywall and the dried joint compound covering the seams. These porous materials will literally absorb your paint right into the wood or drywall if you don’t prime first.

Also, if you have patched or repaired drywall, you will likely have patches of spackle or joint compound on the surface. If these patches are small, there is no need to buy separate primer. You can take a small amount of your regular paint and lightly brush it on the areas you just repaired. When the spots are fully dry, you can paint the wall normally and the spots you worked on won’t show through.

4. When painting over a glossy surface

Glossy surfaces are very hard for paint to stick to. If your wall has been shellacked or been covered in a high gloss or enamel paint, you can try coat after coat of paint and it will never stick

Along with primer, these surfaces may also need some light sanding or buffing beforehand. Doing this will ensure the surface of your walls has enough texture so both the primer and paint can adhere nicely.

5. When you have wallpaper

Whether your wall has some blemishes from the removal of wallpaper or you plan to paint over existing wallpaper, you should definitely plan on using a primer. Each of these surfaces is on the rough side and will benefit from primer.

6. You’re painting over metal or plastic

You can actually find primer that is specifically made for metal. It will help protect from rust and serves as a strong foundation for any future coats of paint.

You definitely need a primer specifically designed for plastic as well. Apply the primer in even amounts to the completely sanded, clean, and dry plastic area.

The Best Sunroom Paint Colors

When you can skip the primer

Your walls are in good shape

If your walls are clean and in good condition, you might be able to eliminate the need for primer. Giving your walls a quick but thorough cleaning is very simple. Create a thin mixture of tri-sodium phosphate (TSP) and water and wipe down the walls with a soft cloth or sponge. Now you are ready to paint.

Your new paint nearly matches the old

When your previous color and the new color you have chosen are the same or even similar, the need for primer is greatly reduced or even eliminated. The base color is not different enough to change or modify the outcome of the topcoat.

The paint you’ve picked already has primer

The new generation of self-priming paints are a thicker paint with primer added. Most of these paints do a great job and provide excellent

coverage. However, these paint primers can’t tackle every job, as we talked about earlier. If you are in doubt before starting a project, you’re far better off taking the time to prime the surface correctly. Your beautiful and satisfying end result will make you glad you did.

Conclusion: Do I need to prime my walls before I paint them?

Hopefully, we’ve answered your question on “do I need to prime my walls before I paint them,” and any other questions you have. If you are considering starting a painting project, and still aren’t sure where or how to start, contact our professionals at PaintRite Pros. We serve the entire Sacramento area including Elk Grove, El Dorado Hills, Stockton, and more! We’ll give you a free estimate. If you or a friend need Spanish speakers, we have various employees who speak it fluently.

Request A Quote

Paint Sheen: What Is It and Why Does It Matter?

Posted on: September 21st, 2020

If you’re looking to spruce up the interior of your home, you likely have the question, “what is paint sheen.” In painting terms, paint sheen is the glossiness of a paint finish. Glossy paints are shiny and reflect more light, while on flat paints most of the light diffuses in a range of angles. 

What are the different paint sheens? 

  • Gloss 
  • Semigloss 
  • Satin 
  • Eggshell 
  • Flat or matte 

Most brands of paint come in several sheens. Gloss sheens have the highest light-reflective characteristics. Next would be semigloss sheens followed by satin and eggshell which are low luster sheens. Lastly, you have flat or matte finishes. 
BEST INTERIOR PAINT COLORS FOR SELLING A HOUSE

What is Paint Sheen?

How do I know what paint sheen to use? 

There’s a rule of thumb to follow when picking paint sheens. The higher the sheen, the higher the shine. The higher the shine the more durable the paint. High gloss sheens are a good choice for areas that sticky fingers will touch such as cabinets, trim, and doors. But high gloss is too much shine for most interior walls. 

Satin finishes are the most commonly used paint for interior walls. They are easier to clean than flat and eggshell paints, which makes them a great choice for high-traffic areas like kitchens, bathrooms, family rooms, and playrooms.  

 While both eggshell and satin are a little less durable, they are both excellent choices for your living room areas. Spills and drips can be easily cleaned or wiped off with a rag.  

You should think about using flat or matte sheens on walls or areas that tend to have a lot of bumps, scratches, or holes because it can hide these blemishes and imperfections really well.  

Best Sheen for painting a brick fireplace 

When painting a brick fireplace, you will want to start by using an indoor acrylic-latex blend paint. The paint needs to be able to withstand high temperatures. As far as what sheen to go with, eggshell is a lower sheen and gives off a warm glow. It is easy to apply and is great at concealing imperfections. Also, purchase a paint roller designed for textured surfaces. This will help cover the likely rough and porous surface of the brick.  

Which paint sheen is best for painting bathrooms? 

Satin is the best go-to sheen for bathrooms. It is more durable and shinier than eggshell, which makes it easier for you to keep clean. Use it for walls, ceilings, and even the trim, because many satin finishes are tougher than they once were. Paints with shinier finishes are the best choice for bathroom spaces that are notorious for large amounts of moisture and potential mold and mildew. A common mistake then is choosing a flat finish for your bathroom walls. 

What paint sheen works best for kitchen cabinets? 

Most people find satin or semi-gloss paint works best for kitchen cabinets or any woodwork in your kitchen. This will give your cabinets a soft sheen that doesn’t look flat. It is also very resistant to scrubbing, making it the perfect choice. Easy maintenance is essential for high-touch areas like cabinets. 

Paint Sheen For Kitchen

The most used sheen of interior paint 

So which sheen is used most often when it comes to interior paint overall? Semi-gloss and eggshell are the most popular. They are a good choice for walls, woodwork, doors, and hallways and meet in the middle with a moderate sheen that isn’t too extreme. 

Conclusion 

Hopefully, you now have a better understanding of the different paint sheen options that are available and know when best to use them. If you live in the Sacramento area and find yourself needing any help with painting projects, feel free to contact us at PaintRite Pros. We will give you a free quote and help in any way we can. Not only do we have employees who speak Spanish fluently but we also serve the entire area including Dixon, Roseville, Vineyard, Laguna, Woodland, and more!
HOW OFTEN SHOULD YOU REPAINT INTERIOR WALLS?

GET FREE ESTIMATE

 How to Clean Walls with Flat Paint 

Posted on: September 8th, 2020

Learning how to clean walls with flat paint is fairly simple and easy to do. You just need to have a few household cleaning supplies and a few simple tips to get you going. 

What are the Benefits of Flat Paint? 

Flat or matte paint delivers a smooth, subtle look and shows very little sheen when dry since it absorbs light. Because it covers so well, flat finishes cover up blemishes and imperfections sometimes caused by poor quality work done by contractors or framers. Using flat paint keeps these minor imperfections from being so noticeable and makes it an excellent choice for your walls. This is why it works great in bedrooms, living rooms, dining rooms, and ceilings.  

Do I Have To Prime Before Painting?

Things to Watch Out For 

The drawback to flat paint is that it’s very quick to smudge or scuff and isn’t very durable. The trick to cleaning your walls when this happens is to start by doing as little as possible. You should also take further measures as needed so you don’t damage the integrity of the finish. If you start by trying harsh treatments or chemicals, you will more than likely not get the results you were hoping for. In this instance, less is definitely better than more. 

What Supplies will you need? 

  • Warm water 
  • Clean rag or soft cloth 
  • Mild detergent 
  • Vinegar 
  • Cleaning pad or eraser 
  • Touch up paint and paintbrush 

How to Clean Walls With Flat Paint

Here are some simple yet highly effective methods to get rid of those ugly scuff marks or stains from your flat paint walls. These tips will help you do it without damaging your paint: 

  1. Cloth and Sponge: The first thing you should try is warm water and a clean cloth or sponge. Sometimes just water alone is enough to remove stains. Try gently rubbing the area and see what happens. Make sure you clean dirt and stains from flat paint walls as quickly as possible. The longer you ignore them, the harder they are for you to clean!
  2. Vinegar and Water: If warm water alone doesn’t do the trick, try adding a very small amount of vinegar to your water or even a few drops of mild detergent 
  3. Specialty Sponges: If the stain still persists you can try using one of the melamine-foam-based white sponges such as the “Magic Eraser” or the “Easy Eraser”. They are non-abrasive and are not likely to mar flat-painted surfaces. But be careful because as these sponges wear down, they have a tendency to leave a white residue on walls that are darker colors such as dark grey, navy, brown, or green.  
  4. Touch Up Paint: A can of touch-up paint may come in handy right about now if nothing else has fully removed the stain. Flat paints are much easier to touch up than semigloss or satin. You just want to make sure the paint on your wall isn’t faded or dirty so the spot you are touching up will match perfectly after the touch-up paint has dried. 
  5. The Last Resort: Last but not least, if all your previous methods have failed, and you have enough matching paint, you can always resort to repainting the entire wall. This will obviously take you more time and prep work but might be worth it in the long run to give you the desired look of a beautifully clean wall. 

Conclusion

There you have it! Now you know how to clean walls with flat paint. If you end up needing to repaint your walls and you live in the Sacramento area, contact us. We serve the entire Sacramento area with interior and exterior painting services. We’ll give you PaintRite Pros for a free quote and we’re always happy to be of service! 

Get Free Quote

How to Paint a Deck

Posted on: August 31st, 2020

When you’re learning how to paint a deck, there are several important things to know and do. We go over those here. Though most homeowners prefer to stain deck boards, painting is a great way to add a splash of color to your outdoor space. Painting your deck opens up a world of opportunity for you. No more are you bound to a solid stain hue. With deck paint, the sky is the limit when it comes to patterns and colors. This allows you the luxury of truly making the space your own. 

If after reading this, you decide you’d like to hire a painting company to help you, we’ll give you a free quote. We have offices in Sacramento and Las Vegas.

How Much Does It Cost to Paint a Deck?

One of the first steps in painting your deck is figuring out how much you can expect to pay. Experts agree that the average cost to paint a deck is between $2 to $5 per square foot. This means that if your deck has a surface area of 300 square feet, it will cost approximately $1,050 to complete. However, this cost is variable and will rise or fall based on several factors including:

  • Labor costs to hire a professional
  • Condition of the deck boards
  • Quality of the paint selected

However, if your deck has already been painted, the cost may be higher. This is because of the additional cleaning and prep required to get the surface ready for a new coat of paint. A pressure washer may be required to help get the deck boards thoroughly rinsed of any debris. 

Deck Paint Pricing

Deck paint varies in price with $40 per gallon being the least you can expect to pay. Some higher quality paints may cost you $60 per gallon but others can be much less expensive. Each gallon of paint is rated to coat from 125 to 300 square feet. Paint coverage will be dependent upon the condition of the wood as well as the color you choose. 

If you want to save a little money on your deck painting job, it’s a great idea to consider this a DIY project. However, hiring a professional is often well worth the extra dollars. Our professional deck painters are careful to prepare your deck and make sure the paint will properly adhere. This ensures an even and more durable finish, saving you both time and money. 

Professional painters, including ours, are well versed in all aspects of deck painting. This expertise allows them to select the right paints to withstand all weather conditions including the hot, dry air in Las Vegas that you’re accustomed to. They also are up to date on the latest techniques and products to improve the longevity of deck painting jobs. 

How to Paint a Deck with Peeling Paint

Peeling paint is a common problem many homeowners face. To add a new coat of paint to your deck, you must first get rid of the old flaking paint. 

There are a few simple steps to helping you get your deck ready for painting. They include:

1. Scrape all peeling paint

You must first remove all flakes of paint from your deck before you can prepare the surface. A stiff brush or a scraping tool does the job well. 

2. Sand the deck

Be sure to sand all areas of the deck where paint chips have been removed. You need the surface to be completely smooth. 

3. Clean the deck boards

Once the surface has been sanded, you’ll need to clean it to remove any dirt. If any debris remains on the deck boards, the paint will not stick to that area. After the deck has been power washed, you must wait a minimum of 24 hours for the wood to thoroughly dry. You can then proceed to the next step: applying the paint. 

4. Paint the deck

When the deck’s surface is clean and dry, you may then begin painting. Thankfully, there are several different methods you can choose from. A brush or roller does an excellent job. For speedier results, consider a paint sprayer. 

5. Allow to dry

Allow the paint to dry overnight or up to 24 hours, depending on your climate. You can then apply a second coat if needed. 

How to Remove Paint from a Deck

If you need to completely remove a coat of paint from your deck, you’ll want to use a stripper. Unfortunately, removing paint from a deck with a stripper involves some mess. 

Strippers come in gel form and are applied to a deck to soften old paint. Once the paint is softened, it can then be rinsed away with a pressure washer or hose. 

However, though strippers do an excellent job, they don’t always get rid of the old paint in one shot. Sometimes, it is necessary to scrub the surface with a stiff brush then reapply the stripper for a second attempt. The deck then needs to be cleaned and allowed to completely dry before applying any paint. 

Can You Paint Composite Decking?

Composite decking is designed to be low maintenance. Its attractive appearance is reminiscent of wood. But if over time you’re thinking a change is in order, you’re likely wondering—can you paint composite decking?

Yes, you can paint your composite deck. This particular type of deck, also sometimes referred to as Trex decking, is intended to never need painting.  However, the surface will accept paint readily. As with wooden decks, you’ll still need to clean, prep, and prime the surface first. 

To paint your composite decking, follow these easy steps:

  • Remove or cover any plants on or near the deck
  • Clean the deck using household cleaners and a power washer
  • Sand the deck to a smooth finish
  • Prime the surface
  • Paint the deck

Thinking of giving your deck a new coat of paint? Follow our top tips to get the job done right or contact us for a free estimate if you live in the Las Vegas or Sacramento areas. 

Should You Paint or Install Floors First?

Posted on: August 24th, 2020

Should you paint or install floors first? If you’re renovating a room in your home, you’ll need to decide which comes first: painting or installing new floors. Most people think that painting should be done first to prevent any spills from marring brand-new flooring. However, experts agree that new flooring should always be installed before you have any interior painting done. If you live in the Sacramento area, and you’d like a professional company to help you install or paint your floor, contact us for a free quote! We serve the entire area including Stockton, Folsom, El Dorado Hills, and Elk Grove. 
FREE ESTIMATE

Why Is it Better to Install Flooring Before Painting?

It’s a natural assumption that painting should take place before installing flooring. However, the opposite is true, and we’re going to tell you why. 

There are several tasks that must be undertaken before laying new flooring in a room. Many of these jobs can cause damage to walls, meaning repairs are necessary. 


fAmong the steps you’ll need to follow before installing flooring include:

1. Removing the old flooring or carpet

Tearing up old carpet or flooring is a very messy job. When removing the old flooring, you’ll likely unearth a vast amount of debris, dust, and dirt. If you choose to paint first, these particles can land in your fresh coat of paint, marring the finish. 

When the flooring is newly installed; often, some damage to the walls can occur. This can leave your newly painted walls with unsightly marks and blemishes. When this happens, you’ll need to repair your walls and apply touch-up paint. These additional steps cost you both time and money, making it clear why flooring before painting is the best idea. 

2. Replacing or repainting trim

Depending on the type of flooring you’ve purchased, removing your baseboards and trim is usually necessary. Once you’ve removed these items, they may require repainting and some repair. When the trim has been reattached to the walls, the nail holes will need to be filled and touchup painting is done.  

By choosing to install flooring before painting, you give yourself the opportunity to do all of your painting in one shot. This is much more efficient and cuts down on the amount of mess involved in the project. 

Some trim and baseboards will need to be installed slightly higher than what was previously in place. If you’ve decided to do your painting first, you may find yourself with an area that still bears the old paint. This would mean a second application of paint is necessary to ensure the entire surface is covered. 

3. Preparing the walls before installing flooring

Depending on what the condition of the walls are, it is a good idea to do all preparatory work before the flooring is installed. This includes any patching, sanding, or wallpaper removal that can be messy and leave behind dirt or debris.  This is a particularly important step if you plan to apply epoxy basement flooring. 
GET MORE INFO

4. Masking 

Once the new flooring has been installed, you’ll be able to protect the surface through the use of painter’s tape and drop cloths. These two items are valuable tools that keep mess to a minimum and protect your floors. 

Most professionals consider painting to be finish work. As a result, they prefer leaving it until the end of the job. With the right precautions in place, installing flooring before painting poses no risk of damage. 

Does the Type of Flooring Make a Difference?

Different precautions must be taken for each type of flooring installed in your home. However, this does not change the fact that when it comes to painting first or flooring first, flooring takes the top position. 

Though some types of flooring such as finished hardwood can simply be installed as-is, unfinished hardwood will need to be stained then sanded. Stain can easily splash on walls, ruining a fresh coat of paint. If the correct amount of drying time has not been allotted, dust and wood shavings can get into the paint on your walls, ruining the finish. 

If your home renovation project includes refinishing existing hardwood floors, it becomes that much more important that your flooring takes top priority over overpainting. Refinishing hardwood involves a lot of sanding and buffing, two jobs that make a lot of mess. 

What If I Want to Install Epoxy Basement Flooring?

What should come first paint or epoxy basement flooring? Epoxy basement flooring still takes the number one position overdoing any painting to the room’s walls. Installing this type of flooring is a multi-step project with curing times required between coats. As with installing other types of flooring, the finished floor can be covered with tarps or drop cloths to protect from wall paint spills. 

Epoxy floors also require a layer of sealant. Any debris, dust, or dirt that falls in the sealer will become a permanent part of the flooring. This means that all walls should be prepared for painting prior to beginning the epoxy process. We also offer painting services for kitchen cabinets, fences, exterior, commercial spaces, and apartments. If you live in Sacramento and decide to install your floors first, we recommend reaching out to LNL Construction

How To Epoxy Your floor

How Long Should You Wait Between Coats of Paint?

Posted on: August 14th, 2020

How long should you wait between coats of paint?

Planning to do some repainting at your house? One of the first steps is figuring out how much paint you’ll need to get the job done. But it’s not just the amount of paint that needs consideration when repainting a room. Paint that isn’t allowed to dry before the application of a second coat is likely to peel, streak, clump, or flake when dry. Experts recommend leaving a minimum of two to four hours of drying time between each coat for best results. 

If you live in Sacramento and decide you’d like to hire professional painters to do the job, we’ll give you a free estimate. We serve the entire Sacramento area including Folsom, El Dorado Hills, Stockton, and Woodland.

How Long Does It Take for Paint To Dry?

What Can I Do to Ensure an Even Second Coat?

A second coat of paint is important to ensure even distribution on the walls. Two coats also ensure the paint is more durable, making it resistant to chipping and fading. 

There are several things to consider in applying your second coat. These include:

1. Curing time

Relying on touch alone is not an accurate measure of whether or not your walls are ready for a finish coat of paint. Each coat requires additional time to set. The type of paint also plays a determining role. Latex paint requires only two to four hours to cure. Oil-based paints can take up to 24 hours between the first and second coats. 

2. Treatment of tools

If paint rollers or brushes are left open to the elements, they can begin to dry. When this happens, it is difficult to coat a roller or brush for a proper application of the second coat. This means the surface of the finish coat may be uneven. For best results, cover all painting tools with plastic wrap and place them in the refrigerator. 

3. Painting technique

In order to ensure an even application, paint should be applied to the walls in the same pattern as the first coat. Experts recommend first cutting in all edges. When all edges have been neatly coated, you can then use a roller to paint the walls in a large W. This can then be filled in with painted by rolling in an upwards and downwards fashion to ensure even distribution of color. 

4. Color consistency

Dark paint colors contain a lot of pigment that can settle to the bottom of the paint can when resting. Be sure to stir the paint very well before pouring it into a paint tray to load the roller. 

Trim Color Ideas

How Many Coats of Paint Do You Need?

Typically, interior walls only need two coats of paint: a first coat and a finish coat. However, dark paint colors may require an additional application to ensure an even finish. 

Some variables that can affect how many coats of paint you may need are:

1. Painting the same color

If you are simply refreshing the same paint color, one or two coats are all that should be necessary. 

2. Painting a new color

If you are painting a room an entirely new color, the number of coats of paint will vary. Dark colors will require a minimum of two coats. However, applying light paint over something dark in pigment may necessitate as many as six coats to cover completely. Using a primer will dramatically cut down on the number of coats required to cover a dark wall color with light paint. 

3. Paint quality

It is quite true that you get what you pay for. Cheap paint is often thin, meaning more coats are required to get a good result. Opt for the best quality paints. They will cost more money but save you time. 

If you follow these steps, you should have no problem painting your walls. You shouldn’t have to worry about things like “how long should you wait between coats of paint,” “what can you do to ensure an even coat,” etc. If you decide you’d like a professional to paint your walls for you, and you live in the Sacramento areas, give us a call or click here to get a free estimate. We even have Spanish speakers if you or your friends only speak Spanish. Whether you need interior or exterior painting at your home or business, nobody will do a better job than us. We also offer a host of other painting services at your home including cabinet painting, garage floor epoxy, and fence painting. If you live in the Boise area, we recommend hiring Boise Home Painting for your painting needs. Tell them we sent you!

Do I Have To Prime Before Painting?


How Often Should You Paint Your House?

Posted on: August 10th, 2020

How Often Should You Paint Your House?

Painting the exterior of your house can be a daunting undertaking. But just how often should you paint your house exterior? With your home being one of your biggest assets, putting off painting for a few extra years can cause serious damage. Painting is a great investment that lengthens the integrity of your home while protecting it from the elements. On average, your house should be painted every 5-10 years depending on the surface type, quality of paint, and signs of wear.

How Can You Tell If It’s Time to Repaint Your Home’s Exterior?

There are some definite signs that can indicate it may be time to have your exterior repainted. Once you notice any of these symptoms, it’s best to act sooner than later to avoid costly damage down the road. 

  • Time To Sell 

If you’re considering putting your home on the market, a fresh coat of paint is a cost-effective way to potentially up its value. Curb appeal plays an immense role when selling your home. A new paint job, using modern and trendy colors can really make your house stand out. Bright trim will make your updated house color really pop! 

  • Fading 

One of the most obvious indicators that it’s time to paint is exterior fading. The Sacramento sun can really do a number on your paint job, especially if your home is a dark color. The most obvious fading will appear where the sun hits it the most. If you notice fading on the shady sides of your house, you could have unwanted water intrusion. 

  • Hardened or Cracked Caulk 

Caulk is meant to expand and contract along with your house. It’s used to seal areas and cracks between your doors and windows. Over years of exposure to the elements, it has a tendency to lose its elastic quality and become hard. If you notice areas with missing caulk, cracked caulk, or caulk that has hardened, it may be time to bring in the professionals. 

  • Before Noticeable Signs of Wear and Tear 

Don’t put off painting until you see visible signs of wear and tear. Once you see chipping or flaking paint, it’s a sign the paint is no longer adhering to the surface. This allows moisture to penetrate the paint and cause issues underneath. Painting your house early on reduces damage and lessens the need for scraping bubbling paint, replacing planks of wood, and caulking seals. 

  • Patching Stucco 

It will save you money in the long run if you patch cracks in your stucco instead of re-stuccoing the entire house. Once patched, paint the entire house. Otherwise, you could have unsightly patches of stucco that are a different shade that doesn’t match or look streaky. 

  • It’s Just Time 

Sometimes it’s smart to paint your home’s exterior even if you don’t see any of the aforementioned signs. Repainting is a good idea if the appropriate amount of time has passed. No signs of wear indicate the paint has protected your home and is holding strong. Stay proactive and ahead of the game and repaint while everything is intact. 

How Often Should You Paint Your House? 

We recommend that exteriors be painted every 5-10 years. This number may change depending on not only the quality of paint previously used but largely what type of exterior surface you’re working with. Here are some good rules of thumb to follow: 

  1. Stucco should be repainted every 5-6 years. 
  2. When painting wood surfaces, 4-7 years is appropriate. 3. Aluminum siding needs to be painted roughly every 5 years.

How Long Does Exterior Paint Last? 

In order to maximize the life of your exterior paint job, you need to start by purchasing the right kind of paint. If you want your exterior paint to last for 5-10 years, there are some things to consider. 

A good quality paint usually will cost around $30 per gallon. Pay attention to labels and be certain to purchase the right kind of paint for your home. For example, if your exterior is made of brick, purchase paint specifically designed for brick or masonry. You’ll need different paint for wood, aluminum, or metal.

Best Paint for Your Home’s Exterior 

You’ll get the most longevity out of your exterior paint job by using superior acrylic or latex paint. Acrylic paints are composed of high-quality ingredients such as pigments and more acrylic solids. Acrylic paint lasts the longest and is widely known for resisting damage caused by weather and the Sacramento heat. Oil-based paints are generally thin and runnier than acrylic and also have a tendency to turn yellow over time from extreme heat. 

HOA’s And Exterior Paint 

An HOA (homeowners association) provides various amenities and benefits for your neighborhood. They set guidelines and boundaries to keep your community safe and cohesive. Some of these guidelines may indicate your responsibility to make certain repairs and touch-ups which may or may not require approval from the HOA. 

Also, your HOA might have specific rules on brand, quality, composition, and even the color of paint you may use. People can tend to be put off by strict guidelines, but they are in place to try to give your neighborhood a unified and well-maintained look. You can always request approval from your HOA but they still may deny your request if it doesn’t fit their standards.

How Often Should You Paint Your House Conclusion 

Painting the exterior of your home is never an exciting task. So, if you have questions about painting the inside or outside of your Sacramento area home, give PaintRite Pros a call. Whether you’re a new homeowner who wants to be proactive and change the color right away, or you’re simply looking to refresh your current color, we’ve got you covered. Our professional exterior house painting crew will improve your living experience by making your home brighter and the place you love coming home to. We serve the entire Sacramento area including Roseville, Stockton, and El Dorado Hills.

How to Paint a Fence

Posted on: July 27th, 2020

Painting your fence can give you a fresh look to brighten up a space that has become dated and boring. Though you could opt to hire a professional, painting your fence is a DIY project you can complete in an afternoon or two. That being said, if you don’t have the time to paint it yourself and you live in Sacramento, contact us for a free estimate

How Much Does It Cost to Paint a Fence?

Painting your own fence can mean a lot of mess for you to deal with. However, it is not a super difficult job for the average Joe to do. Best of all, there are great cost savings to be had if you decide to tackle the project yourself. In general, the cost of supplies for you to paint your own fence ranges from $500 to $700. By comparison, hiring a professional to get the job done will ring in at approximately $2,000.

Obviously, one of the largest differences between the two is the added labor cost incurred when employing a professional. However, painting professionals are able to work quickly and efficiently, ensuring no problems occur. Though their upfront cost is more expensive, you’re guaranteed an excellent result. We back up all our work with a stellar guarantee and warranty.

However, with a little bit of planning and some smart shopping, painting the fence yourself can be a breeze. The main thing you will need is the correct tools to get the job done. 

Can You Paint a Vinyl Fence?

Armed with the right type of paint and the correct tools for adequate coverage, vinyl fences can easily be painted. Since vinyl coatings are designed to last, they very rarely require painting to maintain an attractive finish. However, if you feel it’s time for a change, painting your vinyl fence doesn’t have to be a painful chore. You can purchase paint supplies in Las Vegas at Dunn-Edwards Paints in Summerlin or similar places. If you live in the Sacramento area, you can find what you need at Jerry’s Paint and Supply

The steps you should follow to successfully paint your vinyl fence include:

  • Choosing the right primer, paint, and sealer
  • Clean and prepare the fence for painting
  • Purchase and apply the primer
  • Apply the paint
  • Apply the sealer

Can You Paint a Chain Link Fence?

Chain-link fences are built from metal and are designed to be rust repellent. Over time, you may discover that your fence could benefit from a little TLC. Painting your chain link fence is the perfect solution to restore your fence to its former glory. 

Though a sprayer can be a good idea for some types of fencing, it’s a poor choice for a chain-link fence. A paintbrush is your best option for all fence posts and finials with a roller the best approach for the chain-link itself. 

Primer will only be necessary if your fence is showing some signs of rust development. Otherwise, you’ll find you can simply clean the fence’s surface with a power washer. Any of the original paint that is flaking off the fence can be removed with a wire scrub brush. The surface will then be ready for you to begin painting. 

You should take great care before any painting starts to trim all grass along the fence line. This ensures that all areas of your fence are properly coated. 

The best tip we can offer you for painting a chain-link fence is to work slowly. This will help you prevent any splattering from occurring. 

How to Paint a Fence with a Roller

If you think a roller is the best way to give your fence a coat of paint, you’ll want to be sure you have several on hand. The best idea is to purchase rollers of different sizes. Smaller rollers allow you to easily get into tight spots while larger rollers cover a greater surface area more readily. 

Here are some tips to consider when using a roller to paint your fence:

Purchase the right “nap” for your fence

If you’re uncertain which type of nap is the best for your fence, you’ll want to ask a professional at your hardware store. In general, fences that are constructed from rough materials require a deep nap. 

Consider a roller on a long handle

If your fence is tall, a long-handled roller will make covering the entire area a breeze. 

Purchase paintbrushes in various sizes

Since rollers can’t get into some of the nooks and crannies in a fence, it is a good idea to have some paintbrushes on hand. We recommend purchasing both a 1” and a 3”.

Use a power washer to thoroughly clean the fence surface

Cleaning your fence prior to painting ensures all dirt and debris have been removed. It is also important to allow the fence to completely dry before moving to the next step of the process. Whenever we do any kind of paint job, we make sure to do all the prep work and clean up afterward. A good painting company will do those things for you. 

Use tarps to protect your grass

Laying down tarps is an easy way to be sure your grass remains paint-free.

Use rollers and paintbrushes to apply paint

Rollers are best used to apply an even application of paint over large surface areas. Paintbrushes can then be employed to do any cutting in or to move inside tight places. 

You’ll want to be certain to address any uneven coverage or drips right away. This will ensure your fence has a smooth, even surface of paint when dry.

If a second coat of paint is required, it’s important that you wait until the first covering is completely dry first.  

How to Paint a Fence with a Sprayer 

Want to paint your fence but find yourself short on time? Why not consider a paint sprayer?

A paint sprayer is a great solution for painting wooden fencing. It offers an even application of paint and allows you to cover a large surface area in a short amount of time. As an added bonus, paint sprayers offer even coverage, ensuring a beautiful finish when you’re done. 

Here are some important things to bear in mind when painting with a sprayer:

Allow a “drying” time for new fences

For a newly constructed fence, you will need to wait two to five weeks prior to painting it. This allows any moisture to dry out. 

Be mindful of the weather

The best conditions for painting are days that are sunny and dry. It’s also a good idea to avoid painting when there is wind to prevent splatter.  

Consider the time of day

The more moderate early morning temperatures are ideal for painting with a sprayer. 

Clean the fence surface prior to painting

You’ll need to be sure to thoroughly clean your fence prior to painting with a sprayer. Remove any dirt and debris, paying careful attention to things like spiderwebs. Make use of a brush if necessary to scrub the surface clean. 

Once all dirt has been removed, you’ll need to allow the wood to dry completely prior to doing any painting. Previously painted fences should be sanded as well. 

Use tarps to prevent splatter

To protect the grass and plants close to your fence, make use of tarps. This will prevent them from becoming coated in paint. 

Because it is easy to inhale paint fumes, you’ll want to wear a mask while spraying paint. 

Thin your paint

Since thick paint will clog the sprayer, you’ll need to dilute it approximately 5-10 percent prior to use. 

Spray the paint

Be sure to follow the grain of the wood when spraying for an even application. 

Allow drying

Be certain the paint has thoroughly dried before applying a second coat.

Thinking it’s time to give your fence a facelift?  Follow our top tips for the best DIY painted fence on the block! 

Professional

Painting Services

Have questions about your residential or commercial painting needs? Contact us online or give us a call at 916-667-8050 to request a free estimate appointment.

Call Now